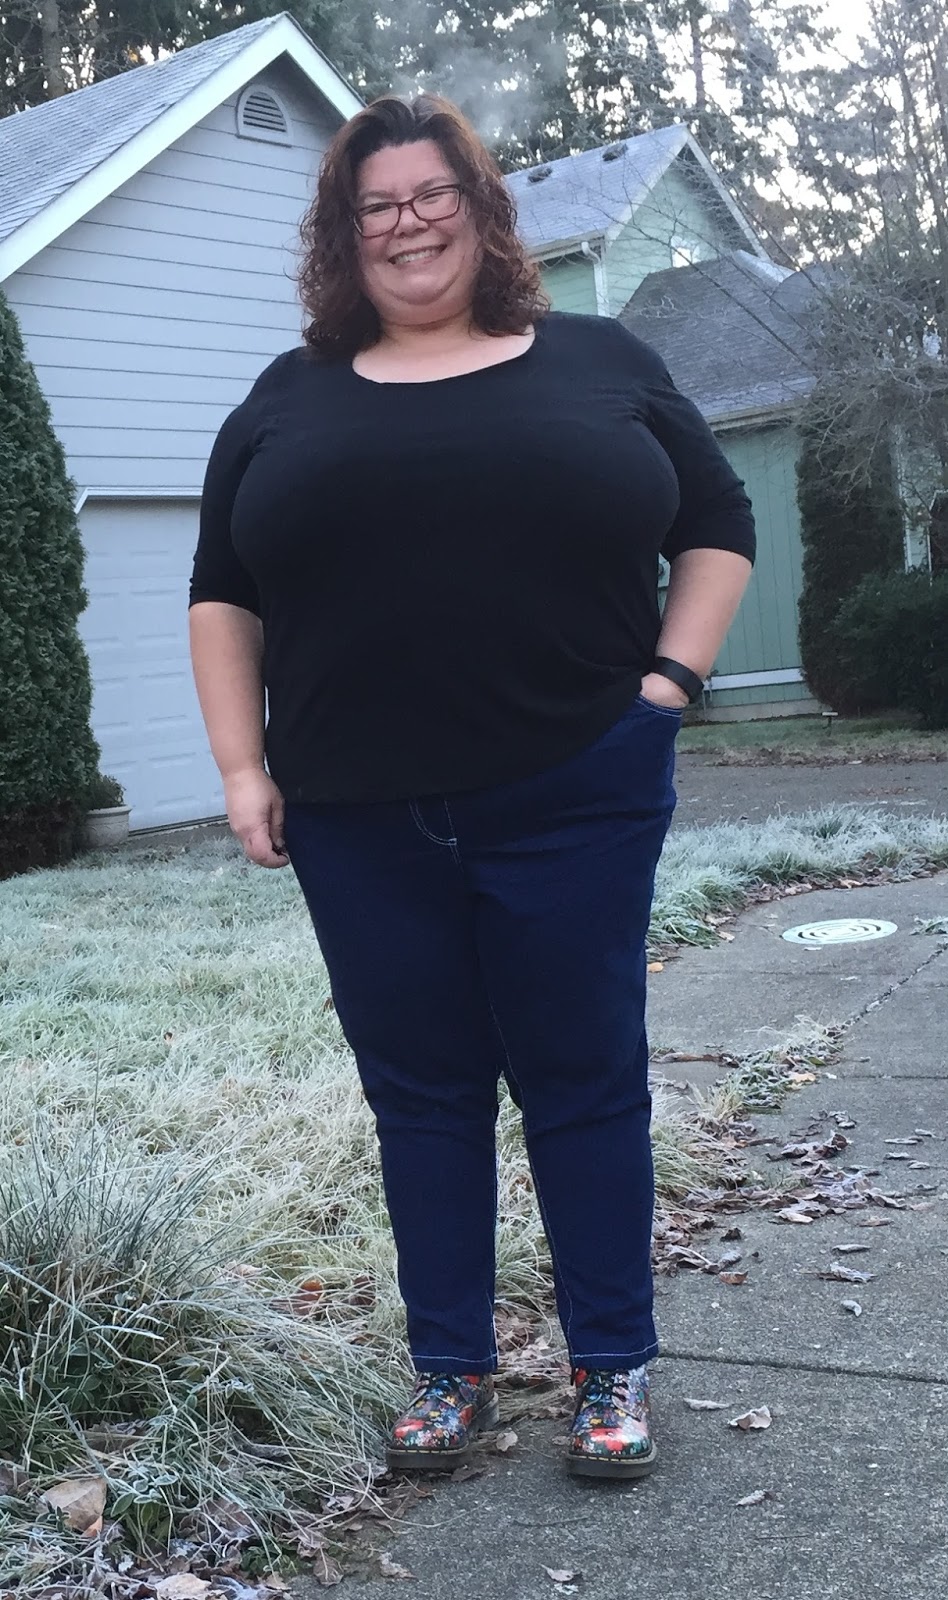
I just did something that I almost NEVER do: I made the same pattern twice in one month. Seriously, I consider a pattern to be a big winner when I keep it in my "queue" pile and don't put it away after finishing it, but diving right into a second version is pretty much unheard of for me. However, I've been wearing my first pair of Misty jeans so much (and also wanted to make some fitting tweaks) that I wanted to get another pair into my wardrobe ASAP.
 |
| StyleArc Misty Jeans - v2 |
For the basic pattern review, you can read
the post that I wrote about the first pair that I made. I'll use this post to cover the changes that I made for this pair, and will post a few side-by-side pics to compare the fit of each pair.
To start, I added functional pockets this time around and got a little fancier with the top-stitching, using white top-stitching thread. Out of the envelope, the front pockets are only a mock pocket with a facing and no pocket bag. I realize that by design, this is meant to cut down on bulk in front, but I really like having a place where I can quickly stick my phone at times. And if you know me, you know that function wins out over bulk reduction every time.
 |
| Functional front pocket |
 |
| Back topstitching and pockets |
So let's take a better look at the fit on these. I used the exact same denim (I'd bought a 5-yard cut) as I did for the first pair, but I made a few new pattern alterations this time around:
- Shortened the jeans by 1" above the knee and another 1" below the knee.
- Did a 1/2" full tummy adjustment using Kathleen Cheetham's method.
- Added a 1" wedge at the CB seam (to give more vertical length), tapering to nothing at the side seam.
- Did a 1/2" knock knee alteration (this was meant to get rid of the "X" wrinkles at my knees in back using Sandra Betzina's method. (There were a handful of different ways to do this alteration I found through searching the internet. Sandra's seemed the easiest, so I figured I'd try her method first.)
- Moved the back pockets in and up a touch.
Let's see how the new jeans compare to the previous pair from the front. Note that I've lightened these photos to better show the wrinkles/details:
 |
| New Misty jeans on the left; Old pair on the right |
As you can see, the length alteration that I made took care of a lot of the wrinkles around the knees that you can see in the old pair (on the right). My shirt is covering the area where I was getting the "tummy pull" distortion on the right, but that is fixed now, too. I do think that the CF/crotch might be slightly too long now, and I might shorten that by a touch the next time that I make these. Overall, I feel like the fit from the front is an improvement.
And here's how they look from the back:
 |
| New Misty Jeans on the left; Old pair on the right |
There's definitely an improvement in that the knock knee wrinkles aren't nearly as pronounced in the new pair. I wonder how much of the improvement is do to the length fixes that I made in this pair, but in any case, the new pair looks better. The back pockets also look better in the new pair. Some of the knock knee alterations also incorporate a bit of a full inner thigh adjustment, and from looking at these photos, I think that would be worth trying for my next pair.
So...I'm getting there. These still aren't quite at the point where I'd just buy a cut of stretch denim and sew them up straight off of my TNT pattern pieces, but I'm pretty happy with my progress. I am sure that you will continue to see more posts from me about new pairs of Misty jeans in the coming months!


I love them and I do like the 'new' version just a bit more. Ah, did you move the pockets higher and more to the center?
ReplyDeleteI also like the white topstitching! Just an all around cute pair of jeans!
Yup, I moved the pockets higher and to the center a little bit. I think that my bum looks a bit more balanced with this positioning.
DeleteI got the idea for the white topstitching from a pair of high-end-looking jeans that a coworker of mine regularly wears. I like how it turned out!
Definitely a fit improvement- especially on the front, which is where it counts! I'm meditation on my next pair but I did such slap-dash alterations on my first pair that I'm not sure where to start with doing alterations on the second. I'm with you, though, I'm wearing mine all the time even though i almost NEVER wore jeans before. I found the front pockets (in addition to being non-functional) kind of small and strangely placed to the side. I may change those on my next version of move the side seam slightly to the front. I love your white topstitching, though i don't think I'm confident enough in my top stitching skills to go for that yet ;)
ReplyDeleteYes! Even with the pockets converted to "functional" pockets, I do find the openings a bit small and over to the side. I don't know if it bothers me enough to change it, though.
DeleteI will go and look up that knock knee alteration as I have never seen that one! I used the stylearc Barb pattern for my go to jeans pattern. I put in front pockets and back pockets. I think the leg is slightly wider but not much wider. I wear them every day that they are not in the wash. I love the stylearc pant sloper! Oh! I love the newer pair more than I loved the first pair. Great fit.
ReplyDeleteThere were so many variations on the knock knee alteration that it made my head spin the first time that I researched it. (I never realized that I had knock knees before, but a few people suggested looking into it after I posted my Burda pants.) The Betzina method is the simplest--create a hinge at the outseam of the upper thigh to slightly increase the inseam length of the inner thigh. This makes sense, since you'd need more fabric to go over your inner leg if they're rotated inwards--this also applies the fat pad that some of us have at our inner knees.
DeleteFitting is still the part of sewing that frustrates me the most, so this is awesome and impressive. I think you've convinced me to buy the pattern though!
ReplyDeleteI agree that fitting is the most frustrating part of sewing! I do love this pattern far more than I ever expected to, though. I know that a decent number of people have been doing the Misty sewalong, so hopefully, we'll start to see some more versions popping up soon.
DeleteWow, they look fantastic. I don't think you have to go far to get a "perfect" fit. How brilliant that would be to sew something straight out of the packet. Looks like a great pattern. Xx
ReplyDeleteThanks!
DeleteI agree with the others that the fit is improved, though the first pair weren't that bad. I like the new placement of the back pockets. As for back wrinkles, meh. No pair of pants will fit perfectly without some wrinkles, right?
ReplyDeleteI love your shoes with the new pic. Are those Doc Martens? =)
Thanks! And yes, those are Docs. :)
DeleteNice work!!!
ReplyDeleteThanks!
DeleteNice! I like both of the pairs you've made so far. I'm in Washington too, freezing frosty mornings the last week or so! Maybe it will cut down on the bugs this spring.
ReplyDeleteYes! It was 27 degrees outside when I took those pictures...without a jacket or a coat. I just wanted to get them taken and back in the house as quickly as possible.
DeleteI am impressed - these look great!
ReplyDeleteThanks!
DeleteGreat looking jeans. I love the white topstitching and the design on the pockets. These look better than most RTW!
ReplyDeleteThanks!
DeleteI almost want to suggest putting the pockets just a tad more into the centre. My instinct would be to lower them aswell so they fall at your butt crease. I don't know a better way to say that.
ReplyDeleteThanks. I know that the convention is that you're supposed to place them so that the bottom point touches the crease, but with my "top heavy" heart-shaped bum, I feel like having them lower tends to emphasize that shape--in that you see just how much excess bum I have up there. :P
DeleteI can definitely see the improvements. Wow--good work Michelle! I am not a jeans person but I will definitely give this pattern a second look.
ReplyDeleteI really like them! I haven't worn jeans in years, but have recently wanted to try more form fitting pants again. I made a first try with a bit of a stretch RPL. Pretty good, actually, and seeing your jeans is encouraging me to keep working on this. Where do you find Kathleen Cheetham's full tummy adjustment?
ReplyDeleteI got it from her Plus Size Pant Fitting Class on Craftsy. It's pretty easy--slash through the CF to the SA at the side seam, where you make a hinge. This gives more length over the tummy. Then, cut vertically down from the waist (at the fullest point of your tummy), spread, and make another hinge there--this gives more tummy width. If I ever have time, I'll do a tutorial showing the alteration.
DeleteThanks.
Delete