Showing posts with label clothes for curvy girls. Show all posts

Monday, November 30, 2015

Finished Project: StyleArc - Misty Jeans (v2)

I just did something that I almost NEVER do: I made the same pattern twice in one month. Seriously, I consider a pattern to be a big winner when I keep it in my "queue" pile and don't put it away after finishing it, but diving right into a second version is pretty much unheard of for me. However, I've been wearing my first pair of Misty jeans so much (and also wanted to make some fitting tweaks) that I wanted to get another pair into my wardrobe ASAP.

StyleArc Misty Jeans - v2
For the basic pattern review, you can read the post that I wrote about the first pair that I made. I'll use this post to cover the changes that I made for this pair, and will post a few side-by-side pics to compare the fit of each pair.

To start, I added functional pockets this time around and got a little fancier with the top-stitching, using white top-stitching thread. Out of the envelope, the front pockets are only a mock pocket with a facing and no pocket bag. I realize that by design, this is meant to cut down on bulk in front, but I really like having a place where I can quickly stick my phone at times. And if you know me, you know that function wins out over bulk reduction every time.

Functional front pocket

Back topstitching and pockets
So let's take a better look at the fit on these. I used the exact same denim (I'd bought a 5-yard cut) as I did for the first pair, but I made a few new pattern alterations this time around:
  • Shortened the jeans by 1" above the knee and another 1" below the knee.
  • Did a 1/2" full tummy adjustment using Kathleen Cheetham's method.
  • Added a 1" wedge at the CB seam (to give more vertical length), tapering to nothing at the side seam.
  • Did a 1/2" knock knee alteration (this was meant to get rid of the "X" wrinkles at my knees in back using Sandra Betzina's method. (There were a handful of different ways to do this alteration I found through searching the internet. Sandra's seemed the easiest, so I figured I'd try her method first.)
  • Moved the back pockets in and up a touch.
Let's see how the new jeans compare to the previous pair from the front. Note that I've lightened these photos to better show the wrinkles/details:

New Misty jeans on the left; Old pair on the right
As you can see, the length alteration that I made took care of a lot of the wrinkles around the knees that you can see in the old pair (on the right). My shirt is covering the area where I was getting the "tummy pull" distortion on the right, but that is fixed now, too. I do think that the CF/crotch might be slightly too long now, and I might shorten that by a touch the next time that I make these. Overall, I feel like the fit from the front is an improvement.

And here's how they look from the back:

New Misty Jeans on the left; Old pair on the right
There's definitely an improvement in that the knock knee wrinkles aren't nearly as pronounced in the new pair. I wonder how much of the improvement is do to the length fixes that I made in this pair, but in any case, the new pair looks better.  The back pockets also look better in the new pair. Some of the knock knee alterations also incorporate a bit of a full inner thigh adjustment, and from looking at these photos, I think that would be worth trying for my next pair.

So...I'm getting there.  These still aren't quite at the point where I'd just buy a cut of stretch denim and sew them up straight off of my TNT pattern pieces, but I'm pretty happy with my progress. I am sure that you will continue to see more posts from me about new pairs of Misty jeans in the coming months!

Monday, November 23, 2015

Finished Project: HotPatterns 1169 Classix Nouveau Refined Peasant Blouse (v2)

Ever since I made my original version of HotPatterns Refined Peasant Blouse last summer, I've been wanting to add another one to my closet. I've been wearing the first version that I made nearly every wash cycle. However, I got a bit hung up on fabric choice for the next version. I absolutely love the cotton double gauze that I used the first time and have been very tempted to make a the second version using the exact same fabric in a different colorway, but that seems kind of boring, doesn't it?

I recently joined the FabricMart Fabricista blogging group, and you'll see me blogging a few projects over there over the next few months. For my first project for them, I wanted to use a pattern that I was fairly comfortable with but choose a fabric that had some "wow factor". I'm a little afraid of sewing with silk (so slippery!), but I felt like making the HP peasant blouse pattern up in a silk fabric would check both of my requirements boxes.

HotPatterns - Refined Peasant Blouse
HP Peasant - back view
I've already reviewed this pattern before, so I won't do an in-depth review in this post, but I will talk a bit about the fabric and construction choices that I made for this version.

Original review/post for the HP Peasant Blouse pattern.

Refined Peasant Blouse - envelope
The fabric that I used was a cranberry-colored silk double georgette. I felt that it would be a good choice for both its drapiness and ability to handle the tons of gathering that's in the neckline for this blouse. On the other hand, like you'd expect from a drapey silk, this fabric was as slippery and wiggly as heck.  I thought about stabilizing it with a starch or a gelatin, but have read enough horror stories online about how difficult it can be to wash those out afterwards that I was wary. (If you have any suggestions for how to stabilize a wiggly silk in a way that washes out easily, I'd love to hear them.)

Surprisingly (to me), the fabric pressed extremely well, and if I made a pressing error, it was also easy to steam the miss-pressing right out of the fabric. I wasn't expecting a fabric as wiggly as this to press as nicely as it did. On top of that, the fabric also raveled less than I had expected.

Here's a closeup view of my gathered neckline:

Refined Peasant Blouse - gathered neckline

I wanted the insides of this blouse to be clean-finished, so I used French seams as my seam finishing method:

French seams
I only made one additional fit alteration to the pattern for this version--I gave myself a little more room in the wrist cuffs because I found them a bit snug on my first version.

Now, in a lesson of how different fabrics behave differently with the same pattern, I had done an FBA (rotated into the neck gathers) for the first version. I didn't necessarily need the additional width that this gave, but I was concerned about the blouse riding up in front if I didn't add extra length there. I think that this alteration worked well in my reasonably-drapey-but-firm cotton double gauze. However, in my super-drapey-not-at-all-firm double georgette, you can see that I'm getting a wrinkle at the bust indicating that there's perhaps too much fabric there.

GOMI-worthy twee pose
Given that I've already altered the master paper pattern, I think I'll be sticking with fabrics with not quite as much drape for future versions--like doing another double gauze version or perhaps a cotton voile or lawn.

Wednesday, November 18, 2015

Finished Project: StyleArc - Misty Jeans

I've had the pattern for the StyleArc Misty pull-on jeans in my stash for about six months now, but I'd been on the fence as to whether to try that pattern or the similar Jalie Eleanor jeans, if I were to dive into the waters of pull-on jeans. (I'd purchased the Jalie jeans, too, because they include both my daughter's and my size jeans all in one envelope.) However, when Alicia of Pandora Sews announced that she was hosting a curvy sewalong for the Misty jeans, I knew that I wanted to take part and finally get my Mistys sewn up.

It's been great seeing so many curvy sewists of many shapes and sizes post their progress on these jeans on Instagram over the past month, so here's my take on the pattern:

StyleArc - Misty jeans
The Misty jean is designed for stretch denim (StyleArc recommends denim with at least 3% spandex), has mock front pockets, a mock front fly, and an elastic waistband.

StyleArc - Misty jean line drawing
I feel guilty liking how these fit and feel as much as I do. I mean, they're elastic-waist jeans! My husband saw the waistband and said, "You're wearing Mom Jeans!"

Out of the envelope (with a few minor changes), though I feel like these are a better fit than the "real" Burda jeans that I've been working out the fit on off and on over the past few months. The Mistys aren't perfect, but they're a few minor pattern alterations away from giving me the fit that I'm looking for, I think.

For comparison, here are the first two versions of my Burda jeans:

Burda v1 - the wearable muslin


Burda v2 -- better
And here are my Mistys, with the only adjustment being adding a bit at the high hip:

Misty jeans
I've clearly still got the knock knee wrinkles, but the other wrinkles between my knee and butt are gone. I do need to add a touch to the length of the CB seam and play around some more with the pocket placement, but I'm pretty happy with these for a first pass.

Here's the view from the front. I see a little bit of pulling through the tummy, so I'll probably do a small full tummy adjustment on my next pair of these.
Misty jeans- front

Fabric and Notions Used


I used the following fabric and notions for my jeans:
  • Fabric: Stretch denim purchased ages ago from fabric.com. I bought this back when everyone was making the Jalie stretch jeans that I never made.
  • Elastic:  1.5" pro-stretch elastic (the pattern calls for an odd size--I felt this was close enough) from Fashion Sewing Supply.
  • Thread: Gutermann jeans top-stitching thread for the top-stitching; regular Gutermann thread in the bobbin and for all of the seams.
Here you can see my top-stitching in all of its glory:

Top-stitching - back

Top-stitching -front

PDF Assembly


N/A. I used the paper pattern.


Pattern Drafting, Sizing, and Alterations


This pattern is available in on the StyleArc website in StyleArc sizes 4-30, which corresponds to 32.6-61" (83cm - 154cm) hips. Additionally, StyleArc has extended sizing up to a size 38 available in their Etsy shop.

I sewed a size 22 with about 2" added to the high hip/waist area.

Pattern Instructions


StyleArc is known for its brief instructions, and this pattern is no exception. However, these jeans are so easy to construct that I didn't really need them. If you do need more comprehensive instructions, refer to Alicia's sewalong.

Misty Jeans Sewalong

Final Thoughts

I like these way more than I thought I would. Next time, I'll make the pattern adjustments that I previously described and want to play around with altering the pockets to make them functional. These jeans are soooooo comfortable and they're nearly as fast to construct as a pair of yoga pants; I will definitely be making more of them.

This pair even earned one of my closely-rationed StyleArc labels:

My StyleArc label

Tuesday, November 17, 2015

Finished Project: Closet Case Files - Clare Coat (Tester Version)

I have been dying to talk about this coat project.  If you're a regular reader of this blog, you could probably tell that based on all of the hints that I'd been dropping about a really well-done coat pattern that I tested with really great instructions. Drumroll...it was the Closet Case Files Clare Coat:

Closet Case Files - Clare Coat
Apologies for the crappy lighting here; I took these photos a while back (note the sandals and lack of tights on my legs), early in the morning. I've wanted to re-do this photo shoot, but if you follow weather in the Pacific Northwest at all, you'll know that we've had an awful lot of rain these past few weeks. (I finally snagged ~10 minutes of non-raininess to photography my StyleArc Misty jeans this morning...which I finished over a week ago and have worn several times.)

First off, let's get a couple of things out of the way. Yes, I pattern tested this coat and therefore received the pattern for free. However, I wasn't asked to blog about this pattern and all of the opinions that I express are mine, blah, blah, blah. And I'm just going to be blunt here; I love this coat. I loved working on this coat, and I'm really happy with how it turned out.

Clare Coat - Side with Zipper

Now let me go on a mini-rant: In blog posts and in the comments sections on other people's blogs, I have two pet peeves that I lament on a semi-regular basis:
  1. The lack of details in the instructions for commercial coat sewing patterns. I found this horribly frustrating last year when I sewed my first coat. As a newbie coat sewist, you don't know what you don't know. The Big 4 patterns that I've looked over typically tell you to interface the collar and the facings, and that's about it. There's nothing about back stays, interfacing the hem, or adding interfacing anywhere else that might give your coat the structure that it needs to actually look good. (When I look at the coat I sewed last year, I suspect that it would have benefited greatly from an interfaced hem...which I didn't do because I didn't know that I should do it.) We can cobble together tips from books and online sources, but I had yet to see a pattern that actually walks you through the process of making a coat.
  2. So many indie patterns are really basic and beginner-oriented. When you look to the brands that carry more detailed and more advanced patterns (e.g. StyleArc, BurdaStyle), the instructions often leave something to be desired. Where are the Intermediate or Intermediate-to-Advanced patterns with the detailed instructions that could help a sewist advance her skills?
Whether intentional or not, this pattern addresses both of those issues. I feel like Heather was really smart choosing an untailored coat style like this one for her first coat pattern--we dip our toe into things like adding support to the garment, but we don't have to worry about lapels, roll lines, pad stitching, or many of the other things that might make coat-making seem intimidating.


But it's $18!


I know that a lot of you are interested in this pattern but probably want to hear more about it before pulling the trigger. I've already seen a few comments online expressing hesitation at the price ($18 USD).

CCF - Clare Coat

IMO, if you like the style of the coat, this pattern is totally worth the $18 investment. And while I technically received the pattern for free, I kind of freaked out over the number of pages to print/tape in the standard PDF version and wound up taking it to a copy shop. So yeah, I've already paid over $18 for this pattern (and will be receiving a free copy of the print pattern), and I'm totally fine with that. Here's what you get for your $18:

  • Two distinctly different coat views. The two views do share a few pattern pieces, but where the views diverge (other than length), you get separate pieces.
  • Separate lining pieces. None of this having to remember to take an inch off the bottom of the bodice pieces, etc. It's done for you.
  • Separate INTERFACING pieces.  Yes, you read that correctly. This pattern includes separate interfacing pieces for the coat front, shoulders, zipper area, hem, etc. 
  • Two-piece raglan sleeves. Yay!
  • Really great instructions. Constructing this coat was a joy. If you're looking to expand your skill set, View A (the one with the zipper) includes clear instructions for constructing welt pockets, when and where to grade/clip your seams, inserting an exposed zipper with a zipper shield, and bagging your lining. (View B is a bit simpler, so if you don't want to tackle those detail, you don't have to, and you'll still get a nice-looking coat.)
Here are a few details/construction shots of my coat:

Clare Coat - Zipper shield

Clare Coat - Neatly bagged lining

Clare Coat - My awesome welt pockets
I realize that I might sound like a commercial for this pattern, but I wasn't asked to write this. I simply feel very strongly that we need more of this type of pattern and fewer boxy woven t-shirt patterns from the indies. I truly feel like Heather knocked it out of the park with this pattern.

On a side note, Heather gave us the choice of sewing View B or View A for testing. I was completely torn as to which view I wanted to make (really liking both views is a big reason why I threw my hat in the ring for testing on this one). I ended up going with View A because I decided that I really liked the zipper and also wanted to try out the welt pocket instructions.


Fabric and Notions Used


I used the following fabric and notions for my coat:
  • Shell: Wool tweed coating from my stash, originally purchased from (now-closed) Fashionista Fabrics. It's quite warm but also quite bulky. This fabric had been sitting waiting in my stash for me to tackle a coat without a ton of seaming, and it felt like a great match for this pattern.
  • Lining: Poly charmeuse purchased years ago from Gorgeous Fabrics.
  • Interfacing: Medium-weft fusible interfacing from Fashion Sewing Supply.
  • Zipper: Custom-shortened separating zipper from Zipperstop. (Pattern testers were given a fair amount of lead time on this coat to source supplies, and I wanted to use a nice zipper.)
Check out my sweet zipper!

PDF Assembly


The test version of the pattern had 80 pages to tape and assemble. (Note that not all pages were used for all views.)  I saw that and promptly sent my pattern to a copy shop to have it printed. The copy shop version printed without issue.

Unless shipping is a major concern or you love taping PDF patterns, you'll probably want to pay a few dollars extra and go for the print version of this pattern.

Pattern Drafting, Sizing, and Alterations


This pattern is available in Closet Case Files sizes 0-20, ranging from a 31" bust/33" hip (79cm/84cm) to a 46" bust/48" hip (117cm/122cm). I'm a little outside of the size range but wanted to keep my pattern alterations to a minimum, so I sewed a size 20 and added a touch to the size 20 seam allowances throughout the body of the coat. I'm actually really happy with the final amount of ease in my coat, but it is riding up a little in front, indicating that I probably should have done some sort of length-only FBA. (This is to be expected, considering my very large bust.)

You can see that it gets slightly hung up on my rear high hip in back, but that's an easy fit issue to fix in future versions.

Clare Coat - back view

I really like the ease-of-movement that I get from the two-piece raglan sleeves. I did not need to do a full bicep adjustment on this pattern, so that was nice. I can easily drive and take my laptop bag on and off this coat without feeling like my movement is restricted.

I found the pattern to be very well-drafted. There was a small error in one of the sleeve lining pieces that the testers caught, but that is supposed to be corrected for the final version. You might notice a slight twist in my raglan sleeve in some shots--this was also corrected for the final pattern. In addition to the sleeve, Heather altered the draft of the collar piece in View A from the test version so that the collar would stand up better.

Lining shot.


You might notice that I reversed the side of the coat where the zipper opening is. That's due to a combination of user error (I cut one of my pieces wrong) and personal preference (for asymmetric things, I prefer to have the opening on the right side because I'm right-handed).

Another alteration I did was to add a coat loop at the back so that I could easily hang the coat up on our rack at work:

My added coat loop

Pattern Instructions


The instructions for this pattern are pretty great; I found them to include just-the-right-amount of detail for a newbie coat sewist. They tell you "sew the bust darts" without holding your hand (I'd assume that if you're sewing a coat, you know how to sew darts) but then go into detail on sewing the welt pockets and bagging the coat lining. 

Final Thoughts


Can you tell that I love this pattern? I realize that the style isn't for everyone. Yes, a more open neckline would "suit" my large/large-busted figure more than View A's neckline zipper, but I don't care; I like it. And if I want to break up the large expanse of fabric, all I have to do is throw a scarf around my neck. Problem solved. Would I sew it again? I don't need another version of View A, given that it's pretty distinctive, but I would like to sew View B, which I think is really cute, too. I love the idea of doing View B in a bright color (like Heather's sample of View A), so I think I'll keep an eye out for an appropriate wool for that version.


So that's my take on the tester version of the Clare Coat. Feel free to ask me any questions in the comments section!

Friday, October 9, 2015

This Week in Patterns (9-Oct-2015)

Friday roundup time! Lots of new patterns this week! We've got new releases from the following pattern companies:
  • BurdaStyle (Plus)
  • Cashmerette 
  • HotPatterns
  • StyleArc
  • Tilly and the Buttons
  • True Bias
BurdaStyle (Plus): October 2015 collection (Evening Elegance)

Although I missed the announcement, at some point in the past week or so, BurdaStyle published the Plus collection from the October 2015 issue to the US website. I didn't have time to do a rundown on the individual patterns, but it's a nice collection of formal and semi-formal patterns. I've been nicely encouraged by the Plus collections in the past few issues of BurdaStyle; they seem to be getting back on track with including nicely detailed patterns with shaping in their plus styles.

BurdaStyle Plus - Evening elegance collection
Cashmerette: Appleton Wrap Dress

I can finally talk about this!  As you all probably already know, my friend and founder of the Curvy Sewing Collective, Jenny/Cashmerette launched her pattern company on Thursday! I've known about this pattern for a while--I sewed up my pattern tester version back in August and have been wearing it regularly since then. I wrote up my full post on it yesterday, so you can check that for details.

It's a great basic wrap dress and should work well on a lot of curvy women. (Just make sure that you pay attention to all aspects of the size chart, including finished garment measurements, when selecting your size.)

Cashmerette - Appleton dress

HotPatterns 1196: Metropolitan Urban Gypsy Blouses

The first of two new HotPatterns is an off-the-shoulder pullover blouse with an optional built-in shelf bra. It's a very pretty blouse in the line drawing, but the bra unfriendliness here makes this a no-go for me.  (Trudy has suggested to others to tuck in the straps from their bras and use the shelf bra as light support to keep the bra in place. I'm not sure that would work on my huge rack.)

HotPatterns - Urban Gypsy Blouse


HotPatterns 1197: Classix Nouveau Skinny Bootcut Jeans

Want.

Already ordered this one. I am thrilled beyond words to see that flared and bootcut jean styles are coming back into style again finally.

HotPatterns - Skinny Bootcut Jean
 StyleArc: Vivienne Designer Frock

StyleArc's designer October release is up, and it's a shift dress with a twist: it has no side seams. StyleArc posted a photo of one of their samples for this dress, and as is usually the case with their "designer" patterns, the made up sample looks much nicer than the line drawing.  I still don't see this dress working on my figure (lack of bust shaping and all) but I really like the design of it for someone who can wear it--I bet this would look great on someone with a pear shape.

StyleArc - Vivienne designer frock
Tilly and the Buttons: Orla blouse

I feel weird including Tilly's patterns in these roundups because I'm so not her target market. To me, this looks like a top version of her Francoise pattern, but with only one set of darts and different collar variations. Maybe I'm missing something?

Tilly and the Buttons - Orla top
True Bias - Roscoe Blouse and Dress

When Kelli released her Roscoe peasant blouse pattern earlier this week, a small portion of the online sewing community almost seemed like their eyes were offended at the unoriginality of releasing a peasant blouse pattern. I don't really have a problem with it--Kelli's aesthetic tends to very much reflect current RTW trends, and blousey peasant blouses like this one are all over RTW right now.

True Bias - Roscoe blouse
Granted, I did raise my eyebrow a touch at how closely the True Bias blouse resembles the HotPatterns peasant blouse that they released about a year and a half ago. If you'll recall, I made the HP version a few months ago, and it's been in regular rotation in my wardrobe since then.  You do get more options with the True Bias version, though.

I have many more issues with the repetition of, say, Tilly's patterns than I do with True Bias offering a take on a current RTW trend. It's not like this new offering is yet another darted A-line shift dress.


Final Thoughts

I've been looking for a jeans pattern like the HP one, so that was a no-brainer to me. I almost succumbed to ordering a similar RTW pair online and thankfully talked myself out of it because the chances of them fitting decently would be so small.

Jenny's new dress is a nice basic with welcome drafting. I'm really happy to see how positive the online reception has been for her pattern launch. I'm aware of a few of the other patterns that she has in the works, and I will say that there's a nice amount of diversity there, in terms of basics and patterns with more of an original design.

 So...what are your thoughts on this week's pattern releases? ;)

Thursday, October 8, 2015

Finished Project: Cashmerette - Appleton Dress (Test Version)


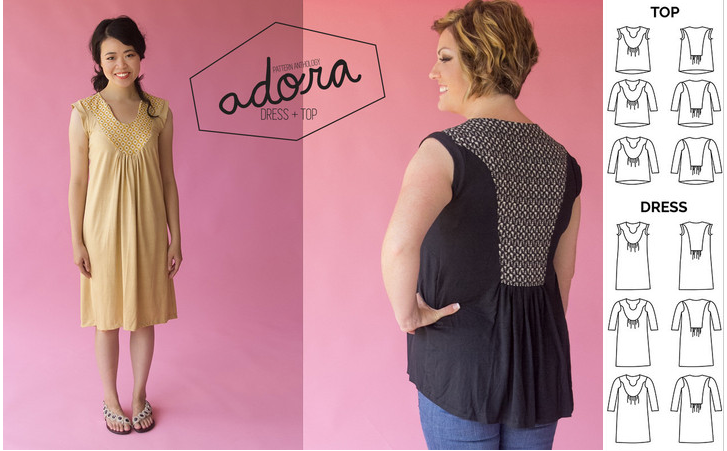
The cat is finally out of the bag!  Jenny/Cashmerette has launched her new pattern line, aimed at curvy sewists. For the first time that I'm aware of, we have a pattern designer who's actually targeting those of us who wear a cup size larger than a D/DD-cup. Jenny actually uses three different pattern blocks--separate ones for for C/D cups, E/F cups, and G/H cups.

Given that one of her favorite garment types is a wrap dress, it probably comes as no surprise that her first pattern release is a wrap dress--the Appleton Wrap Dress.

I had the pleasure of testing this pattern back in August, and while I'm normally hesitant to share "pattern test" versions of the things that I make, I'm making an exception this time because I know that many of you are probably curious about the sizing, etc, especially with this being a new pattern line. Plus, I'm pretty happy with my dress and have been wearing it, so why not share? (As a side note, that test coat pattern that I've been hinting about turned out pretty awesome, so I will be sharing that one too, when the pattern is released. Note that that pattern is from another pattern designer, though.)
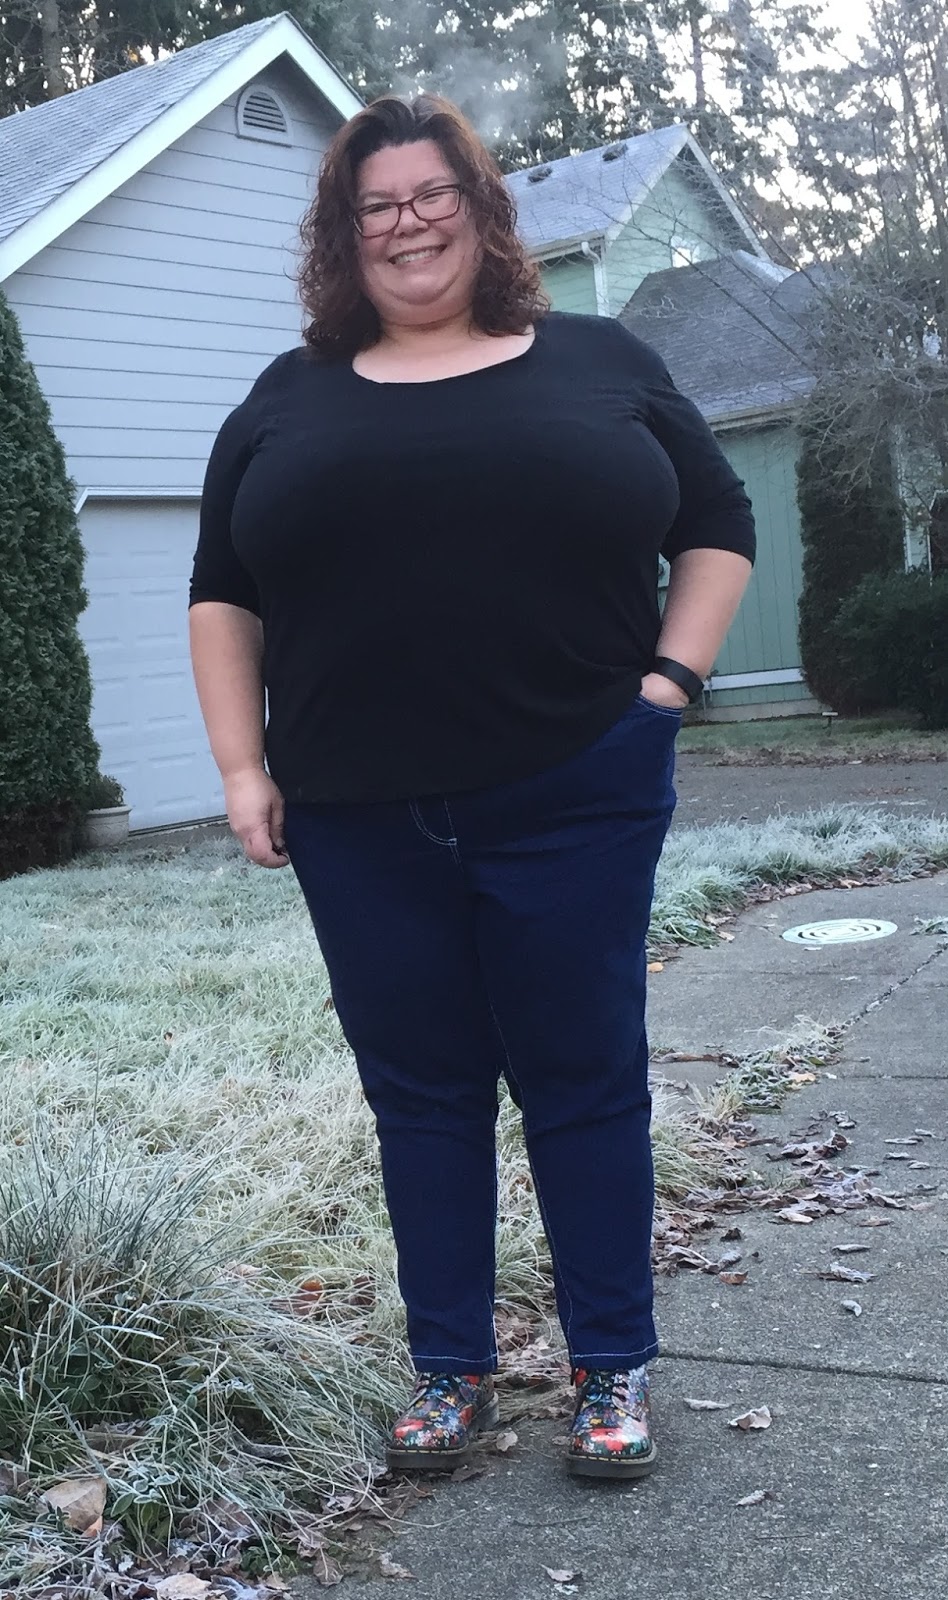
Appleton - on me

A quick note about this photo shoot...  I'd really wanted to get this blog post up today because I suspected that a lot of you would be curious about this pattern. I'd had a bit of a heads up that this release was coming, but our last few mornings had been quite drizzly and unsuitable for outdoor photography. (I usually try to take my blog photos in the morning before I leave for work so that I look a bit fresher, etc.)  I got up extra-early this morning so that I could park at my local park-and-ride and take my commuter bus into work...only to discover that when I was ready to take photos right before I left, the sun hadn't come up yet!

Obviously, I couldn't take dress photos in the dark, so I went ahead and drove to the park-and-ride, hoping that the sun would be up soon. I knew that there was a little park/bike path off in the most remote corner of the P&R, so I gambled that the sun would be up after I snagged one of the last few parking spaces but before I needed to catch my bus. The resulting photos obviously aren't great and are a bit dimly-lit thanks to the sun just coming up, but I figured that dimly lit photos were better than no photos and delaying the blog post.

On to the actual pattern write up...

Again, note that I am talking about the test version of this pattern. I know that Jenny has made some pattern changes, based on tester feedback.

Cashmerette - Appleton wrap dress
 

Fabric and Notions Used


For the main body of this dress, I used an ITY jersey from Gorgeous Fabrics. Yes, it has a purple paisley print, and yes, I do get Prince songs stuck in my head every time I wear this dress. I'd consider this fabric to be light-to-medium weight and fairly stretchy. I wanted something that would skim over lumps and bumps, rather than cling, for this dress, and this fabric fit the bill.

For the contrast bands, I used leftover fabric from a pair of leggings. The band fabric is slightly beefier than the ITY fabric used in the dress body.


PDF Assembly


I used the PDF version of this pattern for my test garment.  The PDF went together beautifully.  Jenny uses faint gridlines on the background of the pattern to help you line things up for taping. I haven't seen many other pattern companies do this, and it was a nice touch.

Pattern Drafting, Sizing, and Alterations


This pattern is available in Cashmerette's sizes 12-28, which equates to a 40" bust through a 58" bust (102cm - 147cm).  The pattern has separate front pieces for each cup size block, with sizes nested within a block. So, for example, if you're sewing a size 20 E/F for your bust, but need a size 22 for your hips, you can easily grade between the sizes of the nested pattern pieces.

Depending on what bra I'm wearing on a given day, my full bust measurement tends to be between 51" and 52" currently. However, taking the negative ease in this pattern into account, I chose to go up a size and sewed a size 24 G/H for my bust, a 26 for my waist, and back to a 24 for my hips.

If you're thinking about making this, you'll want to check out the finished garment measurements for your size. There's a LOT of negative ease in this dress. Knowing that I generally prefer my knit garments to have 10% negative ease at most (preferably less), I went up a size from the size chart for this dress. Ideally, I probably should have gone up at least one more size (and will do so in the future), but I wanted to keep this pattern test as straightforward as possible for Jenny.

Note that I'm short (5'2") and did not make any length adjustments to this dress.

There were a few places where I felt that some of the pattern pieces could have been better labeled and marked, and my understanding is that these changes should be present in the final pattern.


Another Appleton shot


Pattern Instructions


The pattern instructions were nicely detailed and used a sensible order of construction. The accompanying illustrations were clear and appropriate for the construction steps. I'd rate this as an "Advanced Beginner" pattern.

Appleton dress - back view


And in line with Gillian's Better Pictures project and in honor of Jenny's signature twirls, I tried to incorporate a few twirling shots into this morning's photoshoot. You can see that I've still got work to do to try to figure out how to get sharp pictures while incorporating motion, but do I get a participant ribbon for trying?

Blurry twirling shots

Final Thoughts

Finally!  Someone is designing for us busty women! I've been looking forward to Jenny's pattern launch for a while now, and I'm really happy to see the largely positive feedback that I've read so far online.

I really hope that she's able to remove the "FBA hurdle" that a lot of newer and time-constrained sewists face by offering pattern sizes for those of us who are larger than a D-cup. Less time for FBAs means more time to actually sew!

Note: As a pattern tester, yes, I did receive the pattern for free, but this review reflects my own opinions.

Wednesday, September 30, 2015

Finished Project: Blank Slate - Marigold Blouse

I officially kicked off my fall sewing (not counting the pattern test coat that I made) with revisiting a pattern that I made earlier this summer and loved: Blank Slate's Marigold. Even as our weather has cooled, I still wear the shirtdress version that I made in July, although now I'm layering it with boots and a jacket. (Here's a recap of my fall sewing plans.) This time around, I opted to make a long-sleeved blouse.

Blank Slate - Marigold blouse

I won't write up a full review of this pattern, since my very positive opinion of this pattern hasn't changed since the first time that I made it. I also used the same fit alterations as last time--tracing a new copy of the bodice front and back from my previously altered pattern to make my alterations to turn the dress bodice into a blouse.

I used A Happy Stitch's post as a loose guideline for my dress-to-blouse conversion. Here's how I modified the pattern:
  • Raised the sleeve cap height by 1/2" due to the cap feeling too flat in my shirtdress version. 
  • Added 6" in length to the side seams.
  • Added 8" in length to the CB and CF.

    I'm on the fence as to whether I need to add more length next time. The length looks good standing in photos, but it's a little short when I raise my arms. I'm leaning a bit towards adding 1" inch length to both the sides and CB/CF in my next go-around.
  • Added a 2" ease pleat at the top of the CB. I had hoped that this would be enough ease for the blouse to skim over my large bum, but you can see some pooling in the rear view, so that still needs some tweaking:
Marigold blouse - rear view
  •  I did NOT alter the neckline like A Happy Stitch did. I didn't feel like the dress version I made needed that alteration. However, the cotton lawn that I used for my blouse version doesn't sit open quite as nicely. I think that for next time, I will go ahead and open up the neckline a bit. I never button the top button on anything (hello uniboob), so I might as well make this alteration.
  • The blouse pretty much fits straight up and down in this version. I toyed with the idea of adding some shaping, but wanted to see how it fit unaltered first. I do think I could use a little more width through the hips, and I'll probably nip in the waist a touch for next time.
Check out my new shoes!
I'm including the above shot because it shows off my new shoes that I got for my birthday. Is there a more wonderfully 90's pair of shoes than floral print Doc Martens? And no, I don't care if they clash with my floral print blouse.


Fabric Used


The fabric for this blouse is a Robert Kaufman cotton lawn that I bought on sale from Craftsy last summer. It's nice and lightweight but not sheer. As usual, my interfacing is a lightweight fusible interfacing from Fashion Sewing Supply, and the buttons were picked up at JoAnn's.

Final Thoughts


Because of the frustrations that I have with fitting my bust, I hadn't made a button-down blouse for myself in 4 or 5 years. Is the fit on this particular blouse perfect? No, but it doesn't gape or pull at the bust, either, which is a huge accomplishment when you're dealing with G-cups. I'll be perfectly happy to wear this and also to continue to fine-tune this particular pattern until I get all of the fitting kinks worked out.
And here's an outtake pic from my photo shoot. No idea what I was doing here--I think I was trying to twirl or something.

Outtake!

Friday, September 25, 2015

This Week (and Last) in Patterns (25-Sept-2015)

So, no pattern roundup post last week because the only patterns released that I was aware of were the ones from the new Pattern Anthology collection. So, this week, we'll be covering those, the new Sewaholic collection, and the holiday Vogues:
  • Pattern Anthology
  • Sewaholic 
  • Vogue
Pattern Anthology: Unbiased Collection

Ok, I'll admit that I bought this collection back when it was available for a super ridiculous pre-order price, even though there isn't a bloody chance in hell that I'll make two of the patterns. And why would I do this? Do I really have that much of an excess of disposable income? Well no, of course not, but for the time being, the patterns also come bundled with a bunch of significant coupon codes to some of my favorite online vendors and also a few that I've been wanting to try (like Spoonflower). So, out of the four patterns in the bundle, there's one that I'll definitely make, one that I really like and will probably make, and two that I can't see myself ever making. But between the two patterns that I like and all of the coupons, I figured it was a good deal, cost-wise. Anyway, here are the patterns.

Note that the designers in this collective have all recently expanded their size ranges up to 3X--well into the plus sizes. So, regardless of whether you like the designs or not, I feel like more designs for us plus size women is ALWAYS a good thing.

Also note that until the end of the year, these patterns are only available as part of the collection and not available individually. So, that's another reason why I didn't just hold off and buy the 1 or 2 patterns that I really wanted.

Blank Slate: Denver Tunic & Dress

Let's start off with the one that I'm definitely making. In the Blank Slate Facebook group, Melly had actually put out a call for plus size testers for this one a while back, but I passed on it based on the description. Of course, when I saw the line drawing, I ended up kicking myself because with the princess seams and various options, this is right up my alley. I have immediate plans to sew the tunic view, but I also like the fit-and-flare dress (not pictured), too. I'll also admit that I'm biased in that I've had a lot of success with Blank Slate's patterns in the past and am now at the point where I look forward to Melly's new releases.

(And yes, I do notice that one of the models appears to be wearing a garment that's too small in the shoulders. And yes, it's driving me nuts.)
Blank Slate Denver Tunic and Dress

Go To Patterns: Adora Dress and Top

The other one that I like out of this collection is the Adora Dress and Top by Go To Patterns. I like this, frankly, because I think it'll be easy to fit over my giant bum and because I think that it gives some fun options for mixing knits and wovens. I do like the top view of this better than the dress view.
Go To Patterns Adora dress and top
Shwin Designs: Diamond Dress and Top

This is just way too boobtastic for me. Maybe on someone pear-shaped, but not me.

Shwin Designs - Diamond Dress and Top

See Kate Sew: Gwen Dress and Top

This one is just way too Tilly for my personal preferences.

See Kate Sew - Gwen Dress and Top

Sewaholic: Vancouver Collection

After lots of teasers and buzz on Instagram, Tasia from Sewaholic released the Vancouver collection: a collection of active- and outdoors-wear inspired patterns. I'm not Tasia's target customer, so I'm not likely to buy any of these. I do appreciate that she's branching out from beginner patterns and basic skirts and dresses, though.

Fraser Sweatshirt

The Fraser Sweatshirt is a slim-fitting sweatshirt with inset options. I feel the same way about this that I do about the Grainline Lark tee. I can understand why Tasia added this to Sewaholic's portfolio (especially with the success of the Renfrew top), but I won't be buying it.

Sewaholic - Fraser Sweatshirt

Dunbar Top

The Dunbar top is an exercise top with a built-in shelf bra. Given that Sewaholic drafts for a B-cup, there's no way I'd touch this one with a 10-foot pole, even for light exercise like dog walking. This would be too much work for me to re-draft when I already own the Jalie Anne-Marie anyway. The Fehr Trade VNA top is also similar and reportedly tested up to a D-/DD-cup size. But, if you're a pear shape, the Sewaholic is cute.


Pacific Leggings

The Pacific Leggings join the Jalie Cora leggings and Fehr Trade PB Jam Leggings and Steeplechase Leggings as running tights patterns. I can see the appeal of these if you're pear-shaped, but I feel like the piecing/colorblocking potential is more interesting in both the Jalie and Fehr Trade patterns.

Sewaholic - Pacific Leggings


Cypress Cape

The Cypress Cape is probably the most tempting pattern to me, out of this bunch. A) My giant boobs are less likely to interfere with this one and B) it would be practical to own and/or just keep stashed in my desk at work for unexpectedly rainy days.

Sewaholic - Cypress Cape

Seymour Jacket

One of the more interesting pieces in this collection is the short-sleeved hooded Seymour Jacket. If we ever still got rain in Seattle, particularly in the summer, I could see the appeal of this. I also just think it's kind of cute and definitely unique.

Sewaholic - Seymour Jacket

Vogue: Winter/Holiday Collection 2015

Lots of formal and cocktail dresses in this bunch that I have no need for, but a few patterns did stand out to me.

V1468

Let's get this one out of the way first. It's the pit/period-stain dress that has the entire online sewing community giggling. C'mon Vogue, you couldn't do better than this? The dress isn't bad based on the line drawing, but it's not interesting enough to justify that questionable flower placement.

V1468
V9160

Lace romper, anyone?

V9160
V9157

LOVE this jacket/coat. It even has cup sizes!

V9157
V9158

Unappealing styling aside, this is a nice take on an 80's style dress without it actually screaming 80's, IMO. The lack of giant shoulder pads is a huge plus here.

V9158

Final Thoughts

Love it or hate it, the new Sewaholic collection is the most interesting out of the bunch.  As previously mentioned, I do own the Denver tunic and will be making it up and reviewing it soon.  What grabs you out of this bunch? Any must-haves? Or must-avoids?